Gluten Free

Meyer Lemon Blackberry Cake (GF) by audrey gebhardt

I started my first business when I was 14 without having ANY idea what I was getting myself into.

Gluten Free Lemon Blackberry Cake

It really all started when I was in 3rd grade, and I really REALLY wanted the book "A Smart Girl's Guide to Money" from the Scholastic Book Fair (best day of the year). I think this might've been the only time I ever once in my life heard the word 'no' from either of my parents (I am extremely lucky and I know it). It was the best no I could've ever gotten. My mom's reasoning was that she always bought me these books that I never read, and that if I really cared that much about this book I could take it out from the library and take notes on it. 

I ended up doing exactly that, filling out an entire spiral bound notebook that I titled, "I Wanna be an Entrepreneur" and that was it for me. I wrote business plans for everything from a birthday party business, to a craft summer camp that would be held in my backyard (I was planning on being the head counselor at eight years old), to babysitting services (again- I was 8).

Gluten Free Lemon Blackberry Cake

I am so grateful for that no, because without it I would not have read that book nearly as thoroughly as I had to when I was copying it down into my notebook. 

Fast forward to the end of 9th grade. I had been decorating cakes with my mom for a few years for various cousin's birthdays, communions and every holiday under the sun. I decided that I had gotten good enough at my craft that people were going to pay me for it! It can't be that hard, right? At the time it felt so simple, all I had to do was say, "hi, this is a thing I do and you can pay me for it". So I did what anyone would do in 2009 when they want to get paid for something, I created a blogspot website complete with prices and a few photos of my creations and Plays With Food went live. 

Meyer Lemon Blackberry Cake

I had the lemonade stand effect at first after handing out my first batch of business cards (actually business magnets) to everyone within a 1/2 mile radius of Wantagh High School. People ordered cupcakes and cakes from me because I was undeniably sweet as pie and it was cute that I started a business. Looking back at my work, it wasn't all that great and to be honest most of it was made from a box with canned frosting. It might've been full of processed sugar and strange stabilizing substances, but it was also full of passion and drive and effervescent love that only a kid can create when they are excited about something. 

I remember the first time someone told me I wasn't charging enough for what I was doing- I was handing Mrs. Harclerode her daughter's communion cake for 100 guests that I had charged her $60 for, which I felt pretty good about at the time! Holding three $20's feels like a lot when you're 16 and you seemingly made this money appear out of thin air by doing something you love! She took the cake from me and with the most genuine shock looked at me and said, 'you should be charing $200 for this cake!'. That's when I started taking myself seriously. I switched to scratch-baking almost immediately and realized that this was more than a fun thing I did for the heck of it. 

Here I am, nine years, thousands of cupcakes, countless wedding cakes, dozens of baby showers and first birthdays and Christmas pear tarts later- diving back into the catering world. I took a bit of time off to explore being a young twenty something, traveling alone and staying up until the sun came up and moving across the country. I took time off and realized that I miss it. I miss being part of everyone's celebrations. The happy days- the ones where people that love each other gather and eat and drink and be merry. 

Here I am in Denver, starting where I started almost a decade ago- a little less naive, a little more serious and a LOT more stoked to join your party. 

Let's have some cake about it, shall we?

Gluten Free Lemon Cake

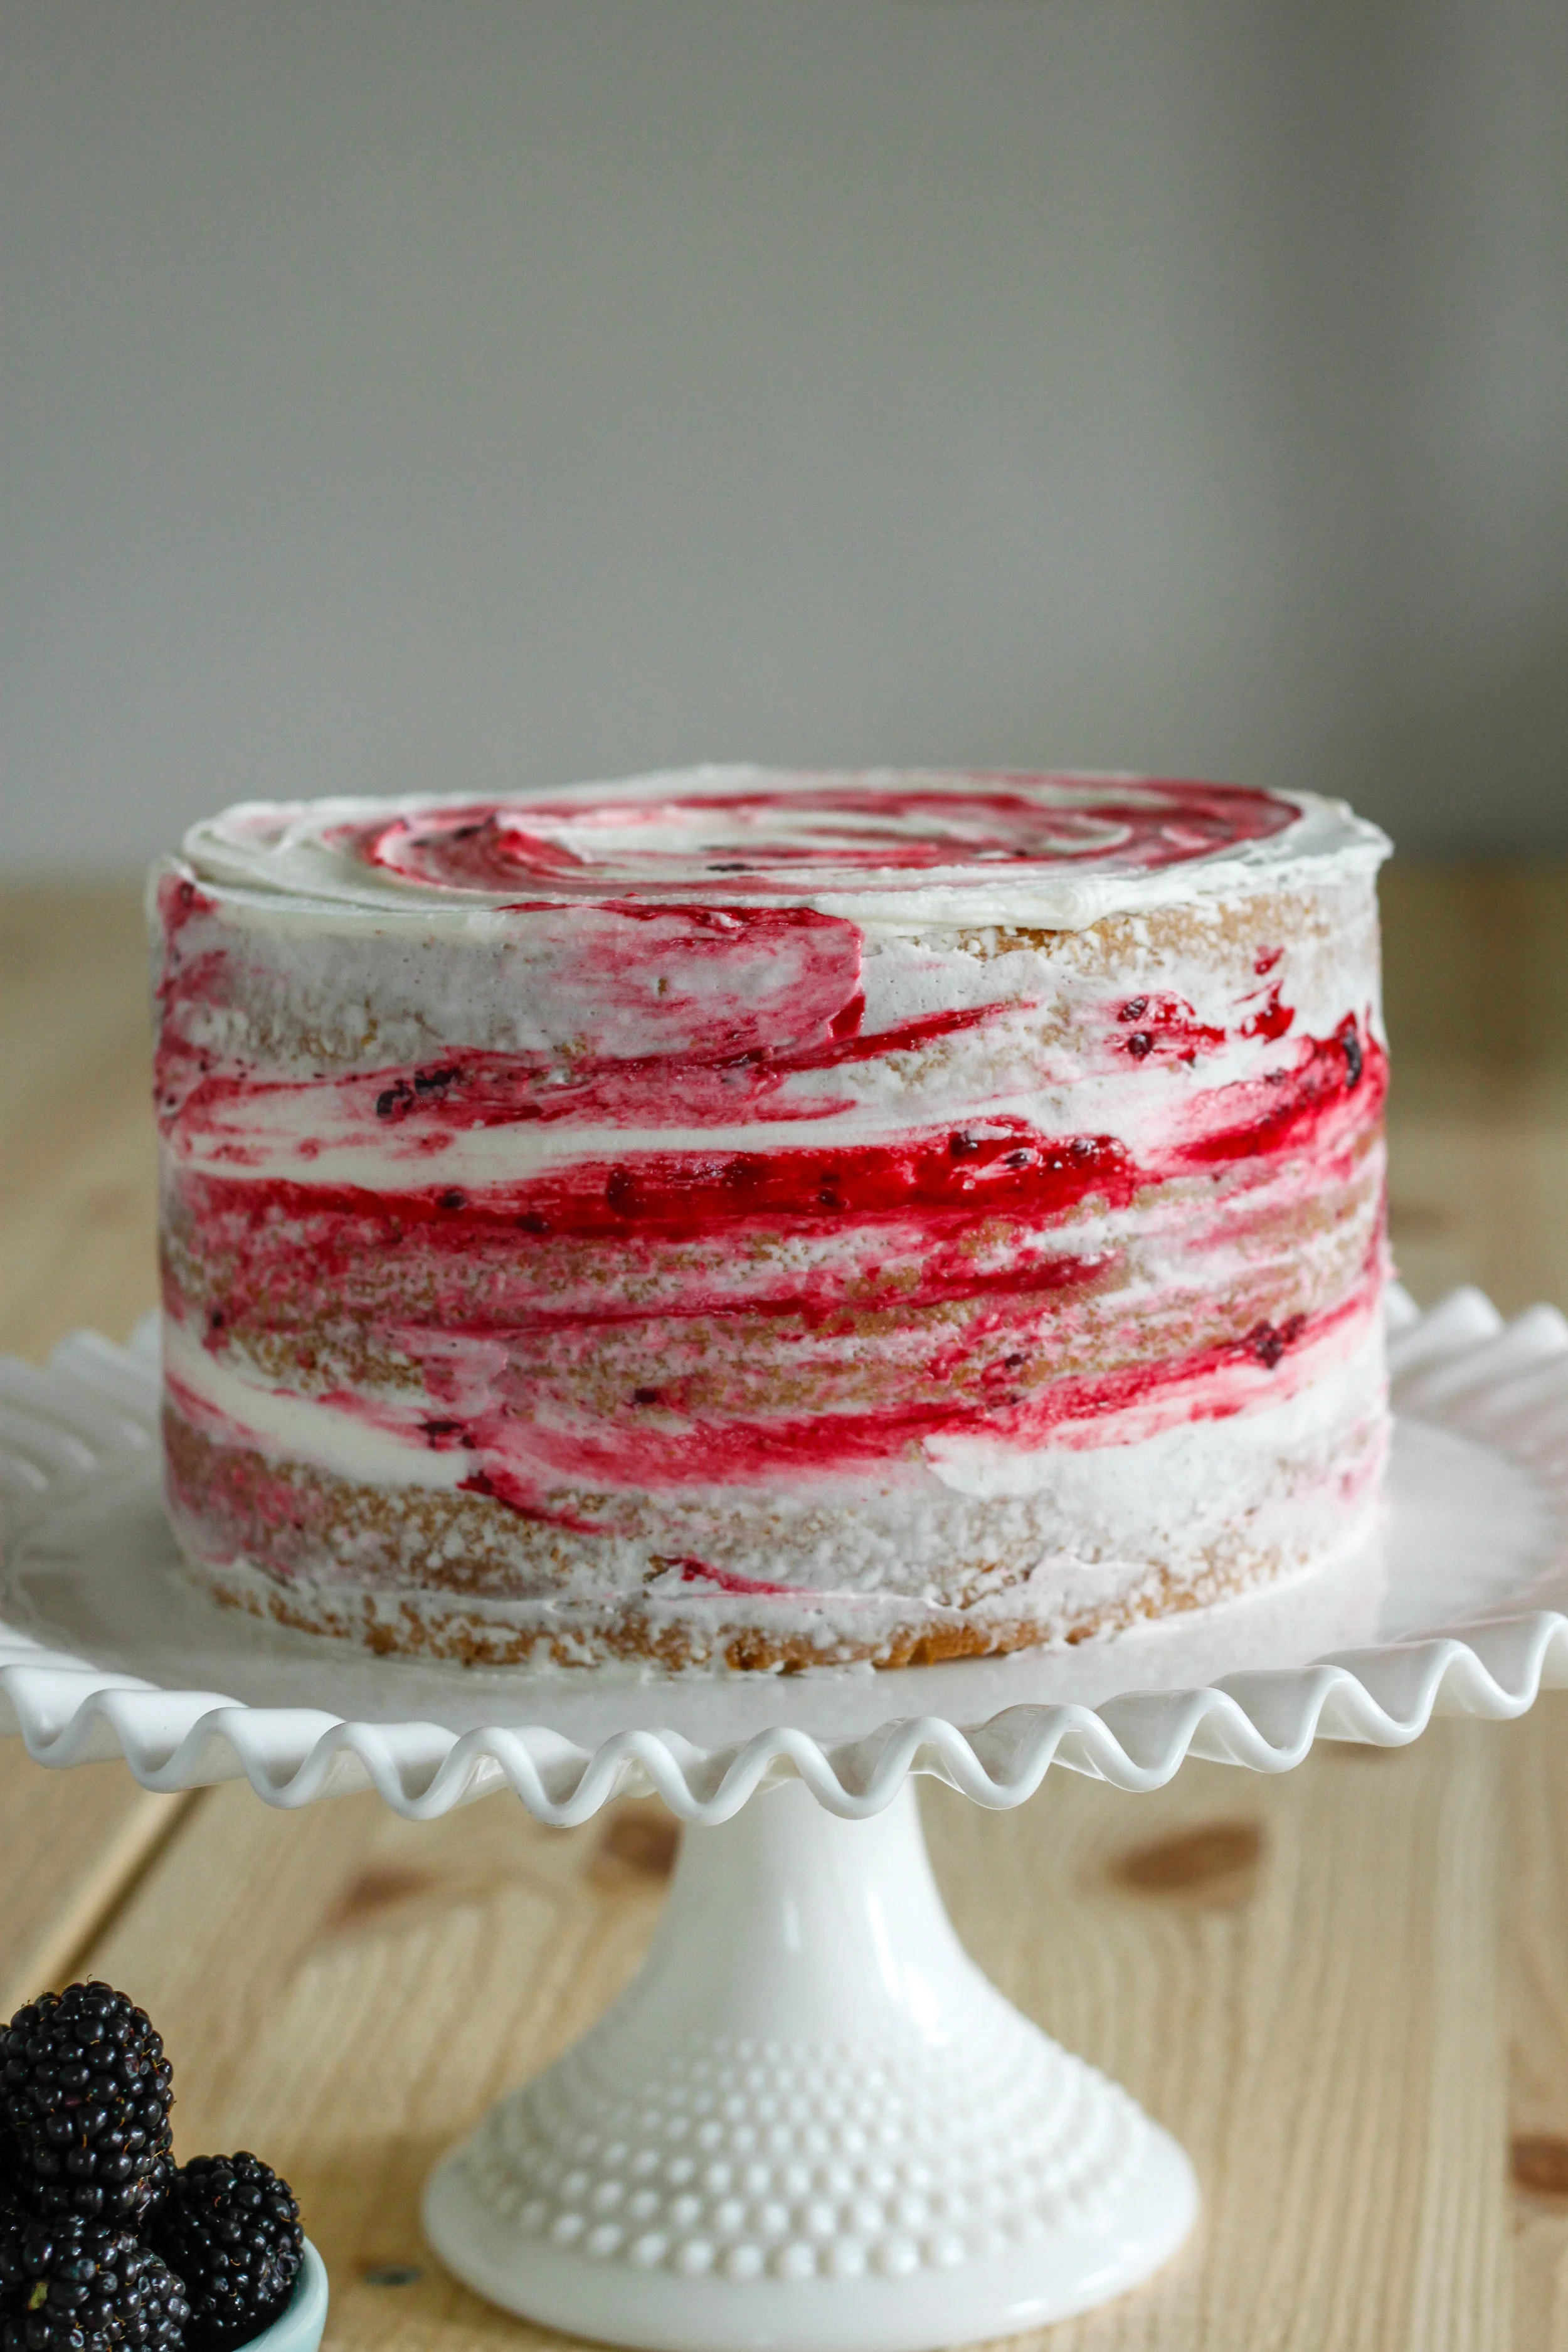
Meyer Lemon Blackberry Cake (Gluten Free)
makes one 8" cake (enough for 8-10 guests)

3 c gluten-free flour
1.5 tsp xanthin gum
1/3 c cornstarch
3/4 tsp baking soda
1 TBSP baking powder
1/2 tsp salt
2 sticks (16 TBSP) butter, softened
zest of 2 meyer lemons (or regular lemons)
2 1/3 c sugar
6 egg whites + 1 whole egg
2 tsp vanilla
2 c buttermilk (or 2 c almond milk + 1 tsp white vinegar)

2 c fresh blackberries
juice of two meyer lemons (or regular lemons) ((use the lemons that you zested for the cake!))
1/4 c sugar
1 tsp cornstarch

2 sticks unsalted butter, softened
1 lb confectioner's sugar
1 tsp vanilla bean paste

Grease and flour three 8-inch cake pans, preheat the oven to 350.

In a medium bowl, whisk together the gf flour, xanthin gum, cornstarch, baking soda, baking powder and salt.

In the bowl of a mixer, combine the sugar and lemon zest. Rub together between your fingertips until the zest is evenly distributed and the sugar is fragrant. Beat the butter and sugar until light and fluffy, about 3 minutes. Beat in the egg whites, egg and vanilla, scraping down the sides of the bowl and beating until everything is totally combined (about 1-2 minutes more). 

Slowly stir in 1/3 of the flour mixture juuuuuust until combined. Now slowly add 1/2 of the buttermilk (or almond milk mixture) and stir just until combined. Repeat with 1/2 of the remaining flour mixture and the rest of the milk, finishing with the last of the flour mixture.

Distribute evenly between the three greased baking pans and bake at 350 for 25-30 minutes, until a toothpick inserted in the center comes out clean and the top springs back when lightly pressed into with a finger. Let cool in pans for no more than five minutes before turning out onto a cooling rack to cool completely.

While the cakes are cooling, make the blackberry filling! 
In a small saucepan, combine the blackberries, lemon juice and sugar. Bring to a simmer over a medium flame then lower the heat to low and keep bubbling for about ten minutes, until the berries start to break down (you can push a few of them against the edge of the pan with a fork to help them along but don't break them all up!). Whisk in the teaspoon of cornstarch then remove from the heat and allow to thicken. Let this cool allllllll the way down before assembling the cake or you will be a very sad baker.

Make the buttercream!
In the bowl of your stand mixer, slowly mix the softened butter and confectioner's sugar until it's all cohesive. Once there are no more bits of sugar flying around your kitchen, crank up the speed on the mixer to high and add the vanilla. Let that go- scraping the sides of the bowl once in a blue for about five minutes. I mean it, five minutes. You want this buttercream to be hella fluffy.

To assemble the cake:
Level any layers that need leveling. What I mean by that is, get eye level with your cakes on their cooling racks and if they have a huge dome you're gonna want to cut across the top to make them all even. 

Place a little dollop of buttercream on the center of the platter you are assembling the cake on, center the first cake on the platter. Using a piping bag, pipe about a 1/2 border of frosting around the top edge of the cake (almost like you're making a fence to hold the filling in, which you are). Pipe a small amount of frosting inside the fence you just made and spread it out evenly so the entire topside of the cake is frosted. Spoon about half of the blackberry mixture on top and spread that out evenly as well. Top with the next cake and repeat this whole process.

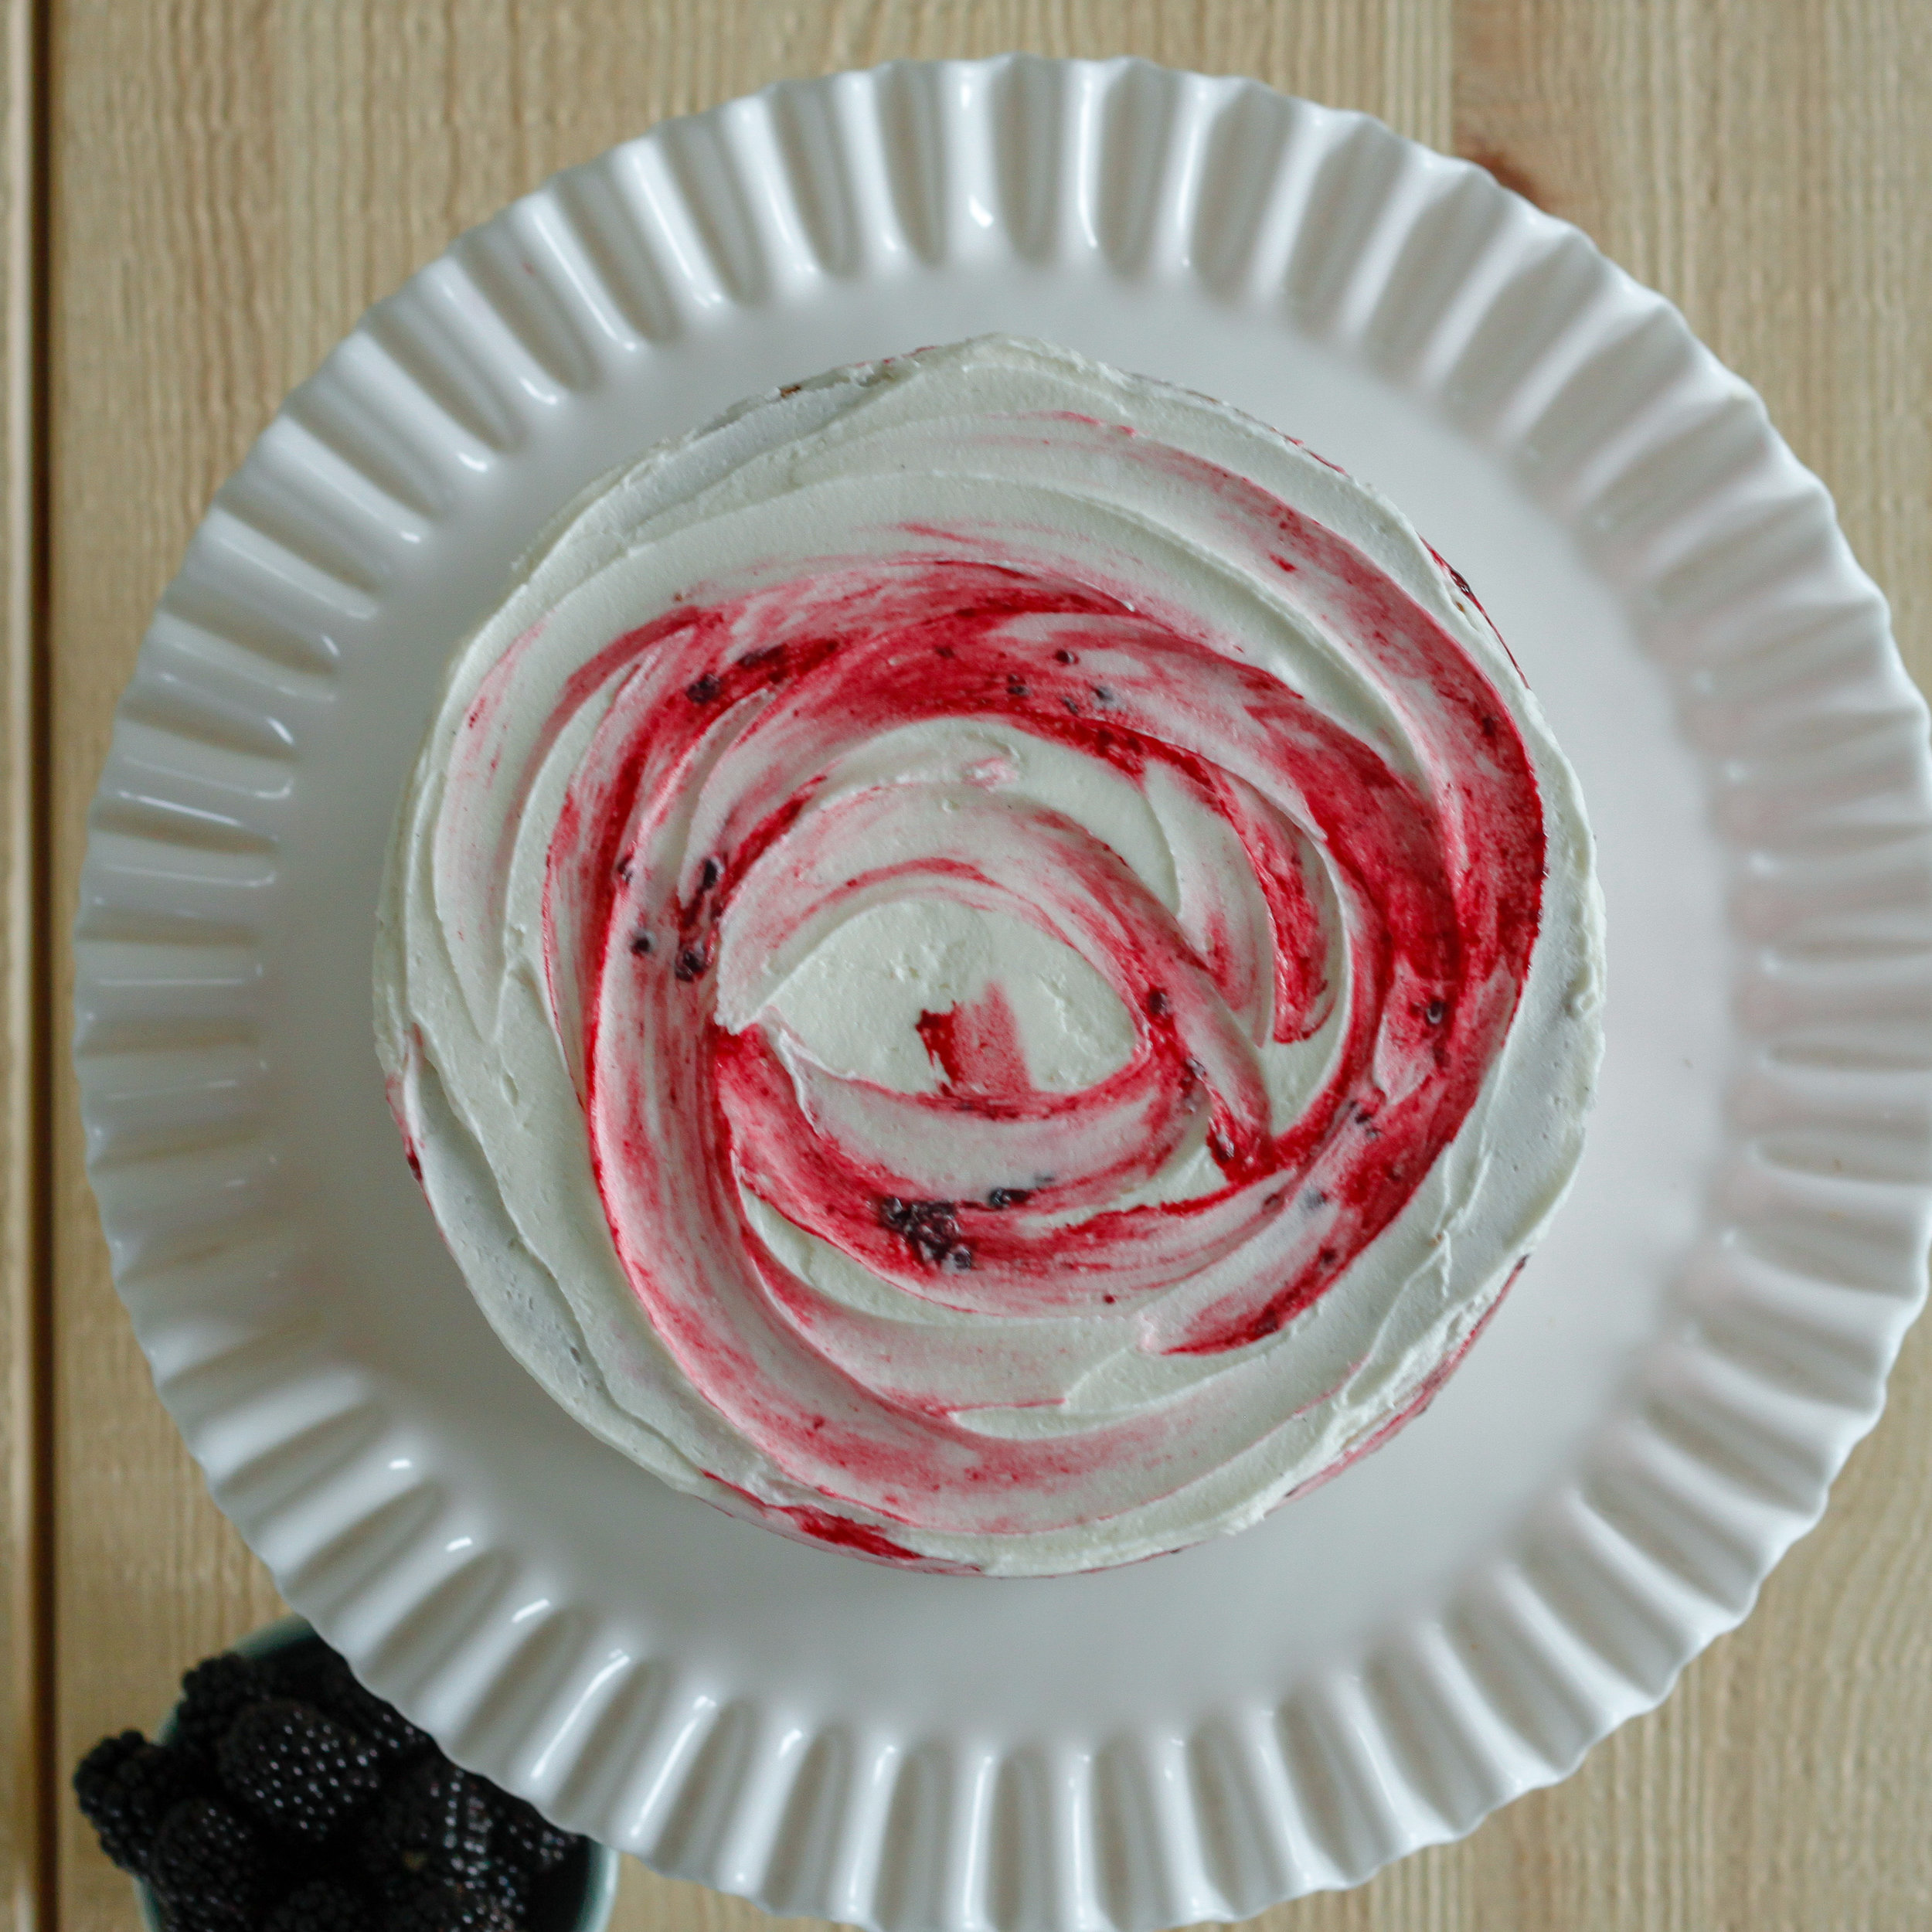
Now you should have a three-layer, unfrosted cake. Dollop about 3/4 c of frosting on top of the cake and start spreading out until you get to the edges, then spread along the edges to kind've seal the filling in. Here's where you get to have some fun with it. I kept the top of my cake extra frosted and took a spoon to add bits of the leftover filling to the cake as I was frosting it to create that streaky thing that you see. 

You are the artist. This is the cake that you get to be the boss of. Go ahead! Tag me on instagram if you make this one @audreygebhardt, I'd love to see what you come up with!

xo
Audrey

Grilled Cinnamon Pineapple Shortcakes (GF) by audrey gebhardt

I went to Hawaii kind've on a whim this week last year.

Grilled Pineapple Shortcakes

I was on a 'finding myself, I'm gonna buy one one-way ticket at a time and see where I end up' trip.

I showed up on Oahu at the same time that the first swell in months had shown up, which meant that the friends I had there were in the water for 18 hours at a time, surfing way above my pay grade while I explored alone.

The first day, I drove up to the North Shore and stopped at this roadside smoothie shack. I had heard such phenomenal things about the pineapples there that I ordered an entire pineapple and ate it all while chatting with the girl who worked there. I made plenty of friends that week exploring on my own, some of them I'm still in touch with!

Grilled Pineapple

An hour later I found myself writhing in pain on the beach, like my stomach was eating my body from the inside out.

Dear reader, do not eat an entire pineapple by yourself. You will probably regret it. 

Since then, I've discovered that if the pineapple is cooked (grilled), my stomach can handle more of it than if it's raw! I guess the heat changes the levels of acid or something like that. 

Not only that, but grilling pineapple gives it this caramelized sweetness. In this version, I added some cinnamon sugar just to up the dessert factor since the biscuits and whipped cream are not all that sweet.

Grilled Pineapple Shortcakes

Grilled Cinnamon Pineapple Shortcakes
makes 6

gluten free biscuits
6 Tbsp butter
2 1/2 c gluten free flour (I like Bob's Red Mill)
1/2 c brown rice flour
1 Tbsp baking powder
1 tsp salt
2 Tbsp sugar
1 egg
1 c almond milk
3 Tbsp heavy cream
1 tsp white vinegar

grilled cinnamon pineapple
1 whole pineapple, peeled and sliced into 1" thick rounds
1 Tbsp white sugar
1 tsp cinnamon 

whipped cream
2 c heavy cream
1 tsp vanilla bean paste

Make the biscuits:
Preheat the oven to 450, line a baking sheet with parchment. 

Dice the butter into 1/2" cubes, freeze for fifteen minutes.

In a medium bowl, combine the gluten free flour, brown rice flour, baking powder, salt and sugar. Whisk to combine.

In a small bowl, combine the almond milk, heavy cream and vinegar. Allow to sit for five minutes or so (this will cause the milk to curdle, you want that! This adds the traditional buttermilk flavor you're looking for). Whisk in the egg until combined.

Using a pastry blender, mix the frozen butter chunks into the flour mixture until it's all cohesive and the butter is the size of small peas. 

Fold in the milk/egg mixture juuuuust until combined. 

Turn out onto a lightly floured surface, pat the mixture out until it's about 1 1/2" tall. Use a 3" round cutter to cut the biscuits (or just slice into squares, we're not picky here).

Transfer the biscuits to parchment lined cookie sheet, bake for 15 minutes until they just begin to lightly brown around the edges. Cool completely.

Grill the pineapple:
Heat the grill to medium high, place the rounds of pineapple on the grill & close it.

In a small bowl, stir the sugar and cinnamon together.

After about ten minutes on the grill, flip the pineapple over (it should be pretty caramelized with nice char marks on this side already, if it's not give it a few more minutes).

Gently spoon the cinnamon sugar mixture on top of the already grilled side of the pineapple (from this point on you won't flip it again or your grill will be hella sticky). Close the grill and cook for another ten minutes or so, until the cinnamon mixture is bubbling on top and the bottom side of the pineapple is nice and caramelized as well.

Remove from grill and cool completely.

Make the whipped cream:
In a medium bowl, add the heavy cream and vanilla. Beat with an electric beater for about two minutes until soft peaks form (don't overmix or you'll have butter!)

When the biscuits and the pineapple are completely cool, cut the pineapple into chunks (removing the hard core). Slice the biscuits in half, top them with a nice dollop of whipped cream and pineapple and repeat. 

These keep beautifully in the fridge for about a day in an airtight container! 

xo
Audrey


Strawberry Smoothie Bowl by audrey gebhardt

This is the strawberry smoothie bowl that I eat for breakfast every.single.day. It keeps me full, energized and satisfies my morning (all day) sweet tooth!

When I was making this this morning I started to think about routines, and how our body falls into such a pattern that most things we do are unconscious. I really recognized this after I had moved out of the house I lived in for 23 years and went back two months later to pack up a few remaining things. It was so strange how even after two months of not being somewhere, my body had the exact same pattern as it always did. Pull into the driveway, hit the garage door opener, walk in the house as I lock my car with my right hand, kick off my shoes, immediately walk through the kitchen to the living room to open the front door and check the mail. 

The first time I did that it felt like there was a ghost of a previous version that took over my body momentarily and knew what to do for me. It got me thinking about where else in my life my pattern has become unconscious. Kind've like how when you are a commuter your morning schedule is perfected down to the second. You look at the clock in your car at 6:27 each morning as you get out to hop on the train. 

Where in your life are you a zombie? What part of your routine has become so monotonous that you no longer need to think about it? What would it be like to switch it up and make yourself a smoothie bowl instead of just grabbing that same cup of coffee on your way out of the house? Could it feel like a treat?

Vegan Strawberry Smoothie Bowl

Strawberry Smoothie Bowl

1 1/2 c frozen whole strawberries
3/4 c unsweetened almond milk
1/4 c orange juice
1 scoop Plant Based Vanilla Protein

to top:
1 TBSP Justin's Vanilla Almond Butter
coconut flakes (I get the unsweetened ones at Trader Joe's)
chia seeds
raw pecans
strawberries
honey

In a blender, blend the first four ingredients for a little longer than you think you need to- this is the difference between a kind've smooth smoothie and a dreamy fluffy creamy smoothie.

Top with whatever you'd like! Sometimes I add chocolate chips, other times I add granola, sometimes I top it just as it's pictured! The world is your oyster!

xo
Audrey

Chocolate Chip Banana Bread (V/GF) by audrey gebhardt

I have been obsessed with a podcast lately. 

gluten free banana bread

It's called Armchair Expert with Dax Shepard, and half of my favorite duo (Kristen Bell & Dax Shepard) created it. I'm totally not a Hollywood person at all. I don't really pay attention to that world and until recently it felt so distant from my own. 

He tends to interview many of his famous friends who grew up similarly to him, in a lower middle class middle America family with a single mom working two jobs. And all I keep thinking about is that everything ever created came from inside of somebody's mind. The personality that sent him into fame and fortune came from inside of him. 

The Apple computer started with something Steve Jobs imagined. 

The first recipe ever created was something a human made up.

The roads that pave the way to the Palace of Versailles were designed by a human. And another human dreamt up the hall of mirrors and then another human reigned a country for 72 years and resided there. 

Vegan Banana Bread

What I'm getting to is that all of this stuff happened because someone at some point in time had a brain that made it happen. 

If you could use your brain to turn your dreams into the real life that you walk through every day, what would you dream? What is the wildest thing you can't imagine possible that you want? 

WOULD YOU DREAM ABOUT FLUFFY BANANA BREAD STUDDED WITH CHOCOLATE CHIPS TOPPED WITH CRUNCHY SUGARY CRUST? 

Because omg would you look at that you just used your brain to manifest your dreams into reality.

Gluten Free Banana Bread

Vegan & Gluten Free Chocolate Chip Banana Bread
2 c gluten free flour blend (I like Trader Joe's)
1/4 c sugar
1/2 tsp baking soda
1/2 tsp baking powder
1/4 tsp salt
3 medium super ripe bananas (like, so ripe that your houseguest looks at your counter and says you should probably throw those out)
juice of 1/2 lemon
1/2 c refined coconut oil, melted
1/4 c applesauce
1 c bittersweet chocolate chips
2 TBSP raw sugar

I used a 6" round cake pan for this because I made it for the full moon and I only eat round foods on the full moon because I'm a LUNATIC. You can totally make it in a standard loaf pan!

Preheat the oven to 375. 

In a large bowl, whisk together the gluten free flour, 1/4 c sugar, baking soda, baking powder and salt. 

In a medium bowl, mash the bananas with a fork leaving some chunky bits. The chunky bits will caramelize in the oven and create sugar pockets that you definitely want. Add the coconut oil, applesauce and lemon to the bananas and mix until combined. 

Stir in 90% of the flour mixture. Toss the chocolate chips in the remaining flour mixture before folding in.

Spoon the batter into your greased and floured pan, sprinkle the top with the raw sugar. 

Bake for 35-45 minutes, until it doesn't jiggle when you move the pan and a toothpick comes out clean. 

Serve immediately. Or not. You can also slice into the size slices that your future self wants to eat and freeze! I made the mistake of slicing this into quarters and now every time me (future self) wants this, I have to eat a quarter loaf of banana bread.

xo
Audrey


Vegan Hot Fudge that will Melt Your Face Off by audrey gebhardt

This post kind've started as a disaster and turned into a masterpiece. A "happy accident" as my high school photo teacher, Ms. Beary would say.

vegan hot fudge-2.png

I was trying to make Roasted Cherry Coconut Almond Vegan Ice Cream, and aside from it being way too many words it was also a rock solid block of ice after it hung out in the freezer for a day. 

Back to the drawing board. 

The greatest blessing about it was that I was planning on swirling the fudge sauce into the ice cream but the fudge was hot so I couldn't and I saved it to pour on top and OH MY GOD IT WILL MELT YOUR FACE OFF. 

You know, like in School of Rock when fake Mr. Schneebly Jack Black talks about the face melting solo? 

mr schneebly

This fudge is the face melting solo. 

It can melt the rock solid ice block of cherries and coconut in your freezer into the most delectable swirl of flavors you've ever had. 

I found myself sneaking demitasse spoonfuls of the fudge for breakfast the next day.

Kind've like when I had 10x the sweet tooth I do now in middle school and kept a can of vanilla frosting in the back of the fridge for an after school pick me up every now and again. 

Vegan Hot Fudge

Make it, maybe/definitely double the recipe. 

I'll show you the ice cream that fed my garbage disposal anyway, since it turned into this gorgeous sunset lavender and who doesn't want to look at aerial shots of scoops?

Vegan Hot Fudge

Vegan Hot Fudge
makes about a cup
(adapted from Minimalist Baker)

1 can full fat coconut milk- DON'T SHAKE IT LIKE A POLAROID PICTURE
1/3 c cocoa powder
1/4 c sugar
1/2 tsp vanilla extract
zest of one orange if you're feeling like Ina- maybe a splash of Grand Marnier as well?!
pinch salt

Open the very still can of coconut milk. If you have just gotten it home from the grocery store or you have shaken it recently, let it take a nap for about an hour. Scoop all of the thick white cream off the top into a saucepan and store the milkier thinner stuff on the bottom in the fridge for smoothies or whatnot.

Whisk in the cocoa powder, sugar and salt.

Cook over med-high heat until it starts to bubble and it's super shiny, about five minutes. Lower the heat if it gets too bubbly/starts to boil. You want a gentle simmer and you want to be constantly whisking so you don't have burnt flavored fudge on your hands.

Remove from heat, stir in vanilla and orange zest only if you're in the mood for orangey chocolate.

Serve over EVERYTHING.

Keeps well in a jar in the fridge for up to two weeks, just pop it in the microwave for a quick thirty or heat the whole jar in a pot with warm water like it's a baby's bottle before serving.

xo
Audrey

Summer Zucchini Pappardelle by audrey gebhardt

This is not the prettiest thing you will ever eat. 

Summer Zucchini Pappardelle.png

It's the kind've beauty that your eyes won't understand, but your tastebuds will. 

Sort of like when you have a new crush and you're showing them off to your best friend but their few random instagram pictures really don't do them justice and your friend is just no understanding what your heart knows. 

Or like when you go to show someone the funniest Youtube video of all time and all of the sudden it's fallen flat and you're sitting there in the discomfort of waiting for it to be funny. You know it, but everyone else doesn't. 

It's secretly the most beautiful thing you'll eat this week. 

I made it with butter (grass fed, because I'm still bougie about butter) because I'm not always vegan. I really really like creamy salty butter. So much so that I think it belongs on a pile of sautéed vegetables that I'm trying to pass off as pasta. You can sub the butter for more olive oil and it will still be yummy!

_MG_7128.jpg

Summer Zucchini Pappardelle
serves 2

2 zucchini
2 cloves garlic
1 head baby broccoli
1 c cherry tomatoes
1 ear corn
2 TBSP olive oil
1/2 tsp salt
1/2 tsp pepper
1 TBSP butter
1/4 tsp crushed red pepper
8-12 leaves basil

Prep the zucchini- using a vegetable peeler (lots of people will tell you that you need to go buy a crazy contraption to make zucchini noodles but I'm here to tell you that's nonsense and I made pretty bomb zucchini pappardelle with a vegetable peeler I got in the Target dollar section in 2006.) peel long ribbons of the zucchini (skin and all) to the seedy part, then flip it over and repeat on all four sides. You can use the seeds but I don't because they kind've fall apart and don't hold together like long noodles should. Stack the widest noodles and cut lengthwise. 

Smash the garlic and heat it over medium heat with the olive oil in a sauté pan. Chop the broccoli lengthwise as well, into 1/4 in segments. After the garlic is pretty aromatic (about one minute), add the broccoli and cover. Allow to steam for about five minutes, stirring occasionally. 

Chop half the cherry tomatoes in half, leave the other half whole. Add all the tomatoes to the pan and cover again, lowering heat to medium low continuing to steam the broccoli and heat the tomatoes until they start to wrinkle and burst. 

Cut the corn off the cob, then use a spoon to 'milk' the starchy liquid from the cob. 

Bring the heat back up to medium and add the corn, corn juice, zucchini ribbons, salt, pepper, red pepper, and butter to the pan. Cover and allow to steam for five minutes, tossing occasionally. Add basil and cook down just until the basil wilts and the zucchini is 'al dente'.

If you want more greens! Add them when you add the basil! A handful of arugula would be delightful- or spinach!

xo
Audrey

The Best Chocolate Chip Cookies for real (V/GF) by audrey gebhardt

I truly believe that chocolate chip cookies are always appropriate. 

Vegan Gluten Free Chocolate Chip Cookies

I know this is the second post about cookies this week, but this is extremely important. 

I made these the other day and planned on sharing them at a later time so this doesn't turn into a cookie blog- but after eating them for three breakfasts in a row I decided you need this recipe and you need it right now. 

Meeting your new boo-thang's parents for the first time? Bring them cookies.

Snow day? Warm chocolate chip cookies.

Got home way too late and a little bit tipsy? Grab a stack of cookies and a tall glass of milk.

Your best friend decided to break up with her boyfriend...again? Show up with cookies.

It's Sunday morning? Cookies for breakfast. 

I dare you to tell me a situation that you wouldn't be happier with a plate full of these cookies.

THE BEST Vegan Gluten Free Chocolate Chip Cookies

Best Ever Vegan/Gluten Free Chocolate Chip Cookies

1/4 c almond butter
1/4 c applesauce
1/2 c sunflower oil
1/4 c granulated sugar
1/2 c raw sugar
2/3 c light brown sugar
1 tsp vanilla extract
2 c all purpose gluten free flour (I like Bob's)
3/4 tsp baking soda
1/2 tsp salt
8 oz bittersweet chocolate, chopped**

Preheat the oven to 350.

In a medium bowl, whisk together the sunflower oil and all of the sugars. Stir in the almond butter, vanilla and applesauce until combined. Whisk in the baking soda and salt- then slowly stir in the flour and chocolate chunks. 

Scoop onto a parchment lined cookie sheet, two inches apart. Bake for 8 minutes until the edges just begin to turn golden brown. Right when you take them out of the oven, gently tap the sheet on the counter so the center sinks in a bit. This makes the cookies a consistent texture all the way through and gives them that gorgeous crackly top!

Allow to cool on baking sheet, store in an airtight container!

I froze half of the scoops until solid and now I have a ziplock bag full of cookie dough just waiting for the day that I come home and desperately need a pile of warm, chocolatey sugar. 

** The reason you want to chop your own chocolate instead of using chocolate chips is because chocolate chips are full of wax to help them hold their shape. While I use chips all the time for times that I'm melting chocolate (ganache, frostings, etc)- I always chop my own bars for cookies because it will give you layers of chocolate and flakes of chocolate all throughout the cookie. This is the difference between something that people eat, and something that people remember.

xo
Audrey

DF/GF Lavender Lemon Shortbread by audrey gebhardt

For real I promise you and whomever you serve this to will have no idea that it's both dairy and gluten free. 

spectacular.png

It's impossible to tell.

The first time I had shortbread was also the first time I had a proper massage. My lovely friend got me a gift card to the Lush Spa in Manhattan an oh my god was it magic. 

First, you walk through the Lush store filled with their signature third eye-opening scent. Then you walk up a cute little staircase to a GORGEOUS kitchen that feels like you're in the home of a faerie. Your massage therapist brings out a platter of lotion bars and lets you choose how you want to smell for the next three days. Then you are led into the themed rooms (I chose some nautical type of massage) where the music is set to your massage- the aromas transport you to dreamtime. I actually felt like I was on a boat somehow.

I did not expect to feel so completely stoned from a massage. The room was spinning, my legs were soooo heavy and I felt like I was a cloud. After you wipe your drool off the massage table they lead you back to the faerie kitchen and present you with loose-leaf tea and shortbread. I was so out of my mind that I actually put a few shortbread in my bag to go- I had never tasted something so melty and buttery and creamy that was solid?! I was confused. I felt great. 

lavender lemon shortbread

Shortly after my shortbread obsession began I also started that dairy-free life. I've been searching for a way to recreate the buttery melty delicious crumbly square for years and I finally stumbled upon it! 

This recipe uses creamed coconut, which you may also see as coconut manna or coconut butter. Same/same! The top of the jar generally has a layer of coconut oil on top, just push that aside and get to the good goods underneath for this recipe!

dairy gluten free lavender lemon shortbread

Dairy Free Gluten Free Lavender Lemon Shortbread

2/3 c sugar
zest 1/2 lemon
2 tsp food grade lavender
1 tsp vanilla extract
1 egg yolk
1/2 c refined coconut oil- room temperature
1/2 c coconut manna
1 3/4 c gluten free flour blend

1 tsp lavender
1 TBSP sugar, to top

Preheat your oven to 350 and find an 8" round cake pan or standard loaf pan.

Flavor the sugar- in a medium bowl, combine the sugar, lemon and lavender. Rub together with your fingers for about a minute until everything is fragrant and evenly distributed. 

Beat in the coconut oil and coconut manna, continue beating until light and fluffy. 

Beat in the egg yolk and vanilla extract.

Stir in the gluten free flour blend.

Press the dough into the pan, use the bottom of a measuring cup to make it even across the top then top with remaining sugar and lavender (I also used calendula petals just for pretties).

Bake at 350 for about 20 minutes, until the top just begins to turn brown.

Let cool completely in pan before removing to cut! 

Shortbread will keep in an airtight container for up to one week.

**If you would like to make these completely vegan, simply omit the egg. I actually prefer the texture without the egg BUT it's not a very practical cookie. They are way too crumbly (which makes for a really great mouthfeel) but they're nearly impossible to transport without the egg to bind them. I have yet to try it but I could see these being successful with a flax egg or even a bit of applesauce to hold them together! 

xo Audrey