vegetarian

Ballin' on a Budget: Lemon Asparagus Risotto by audrey gebhardt

I moved away from the home I lived in my whole life a bit less than a year ago. Some things have felt like a huge adjustment (not having a beach, not having a dozen houses nearby I can walk into unannounced, not eating pizza four times a week).

One of the things that I didn’t think about when I moved was the crocuses. The tiny white flowers that would pop up through the frost right outside my front door! The little flowers that could! Like clockwork, they’d show up within the first few days of March every year, snow or sunshine.

They were like the lighthouse bringing us to shore. The microwave minute nearing an end. The last hour of a red eye flight. And I miss them! I miss their cute lil faces popping up to remind us that one day we’ll be barefoot again.

So today, in Colorado, I’m calling in the crocuses of home with this Lemon Asparagus Risotto. This creamy, bright, flavorful dish comes together in about 30 minutes and pops in your mouth with a zing. All of the flavors of spring with the comfort of a still needed warm bowl of food.

In this recipe you can absolutely swap out the asparagus for whatever dark leafy green you have on hand, or even broccoli if that’s what you have! Risotto is extremely forgiving so this is a very loose recipe.

Lemon Asparagus Risotto

Lemon Asparagus Risotto (vegan optional)
Makes enough for 4 as a side dish

1/3 c diced onion
1 bunch asparagus, chopped into 3/4-1” chunks
1 lemon
1 c arborio rice
4 c vegetable stock (room temperature or warmed up-not cold!)
1 c water
2 Tbsp olive oil
1/2 tsp salt
1 tsp fresh ground black pepper
1/2 c grated parmesan cheese (optional)
2 Tbsp butter (optional)

Toast the rice. In a large saucepan over a medium low flame, place the dry cup of arborio rice. Allow the rice to toast, moving around every so often so it doesn’t burn on one side. It will turn light brown and smell super nutty- remove from pan and place aside for now.

In the pan you just used, add the olive oil and onions over a medium flame. Sauté for about 5 minutes, until the onions are soft and translucent. Add the toasted rice and two cups of the vegetable stock. Bring to a simmer and allow to simmer, stirring occasionally until almost all of the liquid is absorbed.

When almost all of the liquid is absorbed, add another cup of stock and repeat the simmering process.

Repeat with the final cup of stock. At the end of this simmering point, the rice should be nearly finished cooking.

Add the cup of water and the chopped asparagus, cook for another five minutes until all of the liquid is absorbed and the asparagus is bright bright green.

Stir in the lemon zest, salt and pepper (and at this point you can add the parm + butter if you’re using them! It’s still creamy and delicious without it but that definitely adds an extra layer of flavor!).

Serve immediately.

xo,
Audrey

Ballin' on a Budget: NY PIZZA EDITION by audrey gebhardt

I’m starting a new series on here called “Ballin’ on a Budget”. The idea came to me this week when I was evaluating my finances and budget for 2019. I realized that my boyfriend and I are really good at feeding ourselves delicious meals without spending too much money. We prioritize food over a lot of things, and by making most of our food from scratch we’re able to afford high quality ingredients and make restaurant quality meals for a fraction of the price.

Easy New York Pizza

While I won’t break down these meals into dollars and cents since we all shop at different grocery stores, I will give you an idea and try to keep these meals that you can feed an entire family with between $10-20 maximum.

Easy NY Style Pizza

Whatever your situation is, whether you’re paying off student loans or credit cards or saving for a house or wedding or baby, we can all agree that most of us would like to save a few bucks here and there, right?

Easy NY Style Slice

This series is here to help you understand that broke doesn’t have to mean pb&j for every meal.

I thought nothing was more apt to start this series off with than my favorite food on the planet, NY style pizza. While Colorado has plenty of delicious brick oven Neapolitan style pies, sometimes you just need a big old cheesy NY slice. Foldable crust, tangy sauce, salty mozz, endless joy.

you bet your bottom dollar I folded that slice and took it straight to the face.

you bet your bottom dollar I folded that slice and took it straight to the face.

This recipe might look a bit wordy and daunting but trust me, it’s mostly little techniques that make this pie perfect. None of it is complicated, just make sure you read through the recipe once or twice before starting!

NY Style Pizza
recipe is for four 14” pizzas for LESS THAN $10 total! (I made all four on the same day and froze the slices of two of them wrapped in foil and then a big ziplock! Pop them in the toaster oven and they’re good as new!)

you will see that the dry ingredients are measured by weight. I highly suggest doing the same as the dough will be more accurate every time if you do that.

dough (recipe adapted from Feeling Foodish) \\ do this 1-3 days in advance
-6 C all-purpose flour (28oz)
-2 1/4 C water (about 95 degrees, think bathtub)
-1 tsp instant dry yeast (3.5 grams)
-2.5 tsp salt (15 grams)
-2 tsp sugar (8 grams)
-1 Tbsp olive oil

sauce
-28 oz canned tomato sauce
-1/4 C olive oil
-1 tsp dried basil
-1.5 tsp dried oregano
-1.5 tsp salt
-2 cloves fresh garlic
-pinch red pepper flakes
-1 tsp red wine vinegar

other
-16 oz low moisture full fat mozzarella
-1/4 c cornmeal

MAKE THE DOUGH:
Place water in a large mixing bowl.
In a separate bowl, whisk together flour, salt, sugar & yeast.
Stir flour mixture into the water until all of the flour is wet, add oil after and knead on a floured surface for about 5 minutes until you have a smooth dough ball.

Divide dough into four equal pieces and place each dough ball into a well oiled gallon ziplock or quart container. Immediately place in fridge and allow to hang out for at least 24 hours and up to 4 full days. I made pizza on a 24 hour crust and again on a 72 hour crust and the third day was the best one! This cold fermentation technique really allows the gluten to develop and creates a crust that is easily manipulated without ripping or tearing.

REGULAR PIE
If you have a pizza stone, place it on the top rack of the oven about 6-8” from the top. This creates that short oven type heat that you would get in a standard pizza oven! If you don’t have a pizza stone don’t fret! You can use a baking sheet flipped over so you have a flat surface to bake the pizza on.

Preheat the oven to 500 degrees and let it preheat for about an hour while you prepare the pizzas.

Take the dough out of the fridge, you’ll want this to hang on the counter for about an hour as well to come to room temperature so it’s really easy to shape.

While the dough is hanging and the oven is heating, make the sauce. In a blender, combine all of the sauce ingredients (whole cloves of garlic!) and blitz for about a minute until it’s all combined. If you don’t have a blender, chop the garlic very fine and just stir everything together.

Grate the cheese and place the grated cheese back in the fridge until you’re ready for it.

After the dough has been out for an hour, let’s get making pizzas! To stretch the dough, DO NOT EVEN THINK ABOUT GETTING A ROLLING PIN. If you’re new to this, DO NOT TRY AND THROW YOUR DOUGH. Dunk each side of the dough ball into flour and form into a disk on your counter. Starting from the middle, press the dough down and out working in a circle, leaving a 3/4-1” border that will be your crust. Homeboy has a pretty standard and simple technique here if you want to watch! If you have a pizza peel, dust it with cornmeal. If you don’t, dust a flipped over sheet pan with cornmeal. This is just a surface that you can build your pizza on and then slide it off easily onto the pizza stone when it’s done. Transfer your dough onto the cornmeal-dusted surface and give it a lil shimmy to make sure it will move off of the peel/pan.

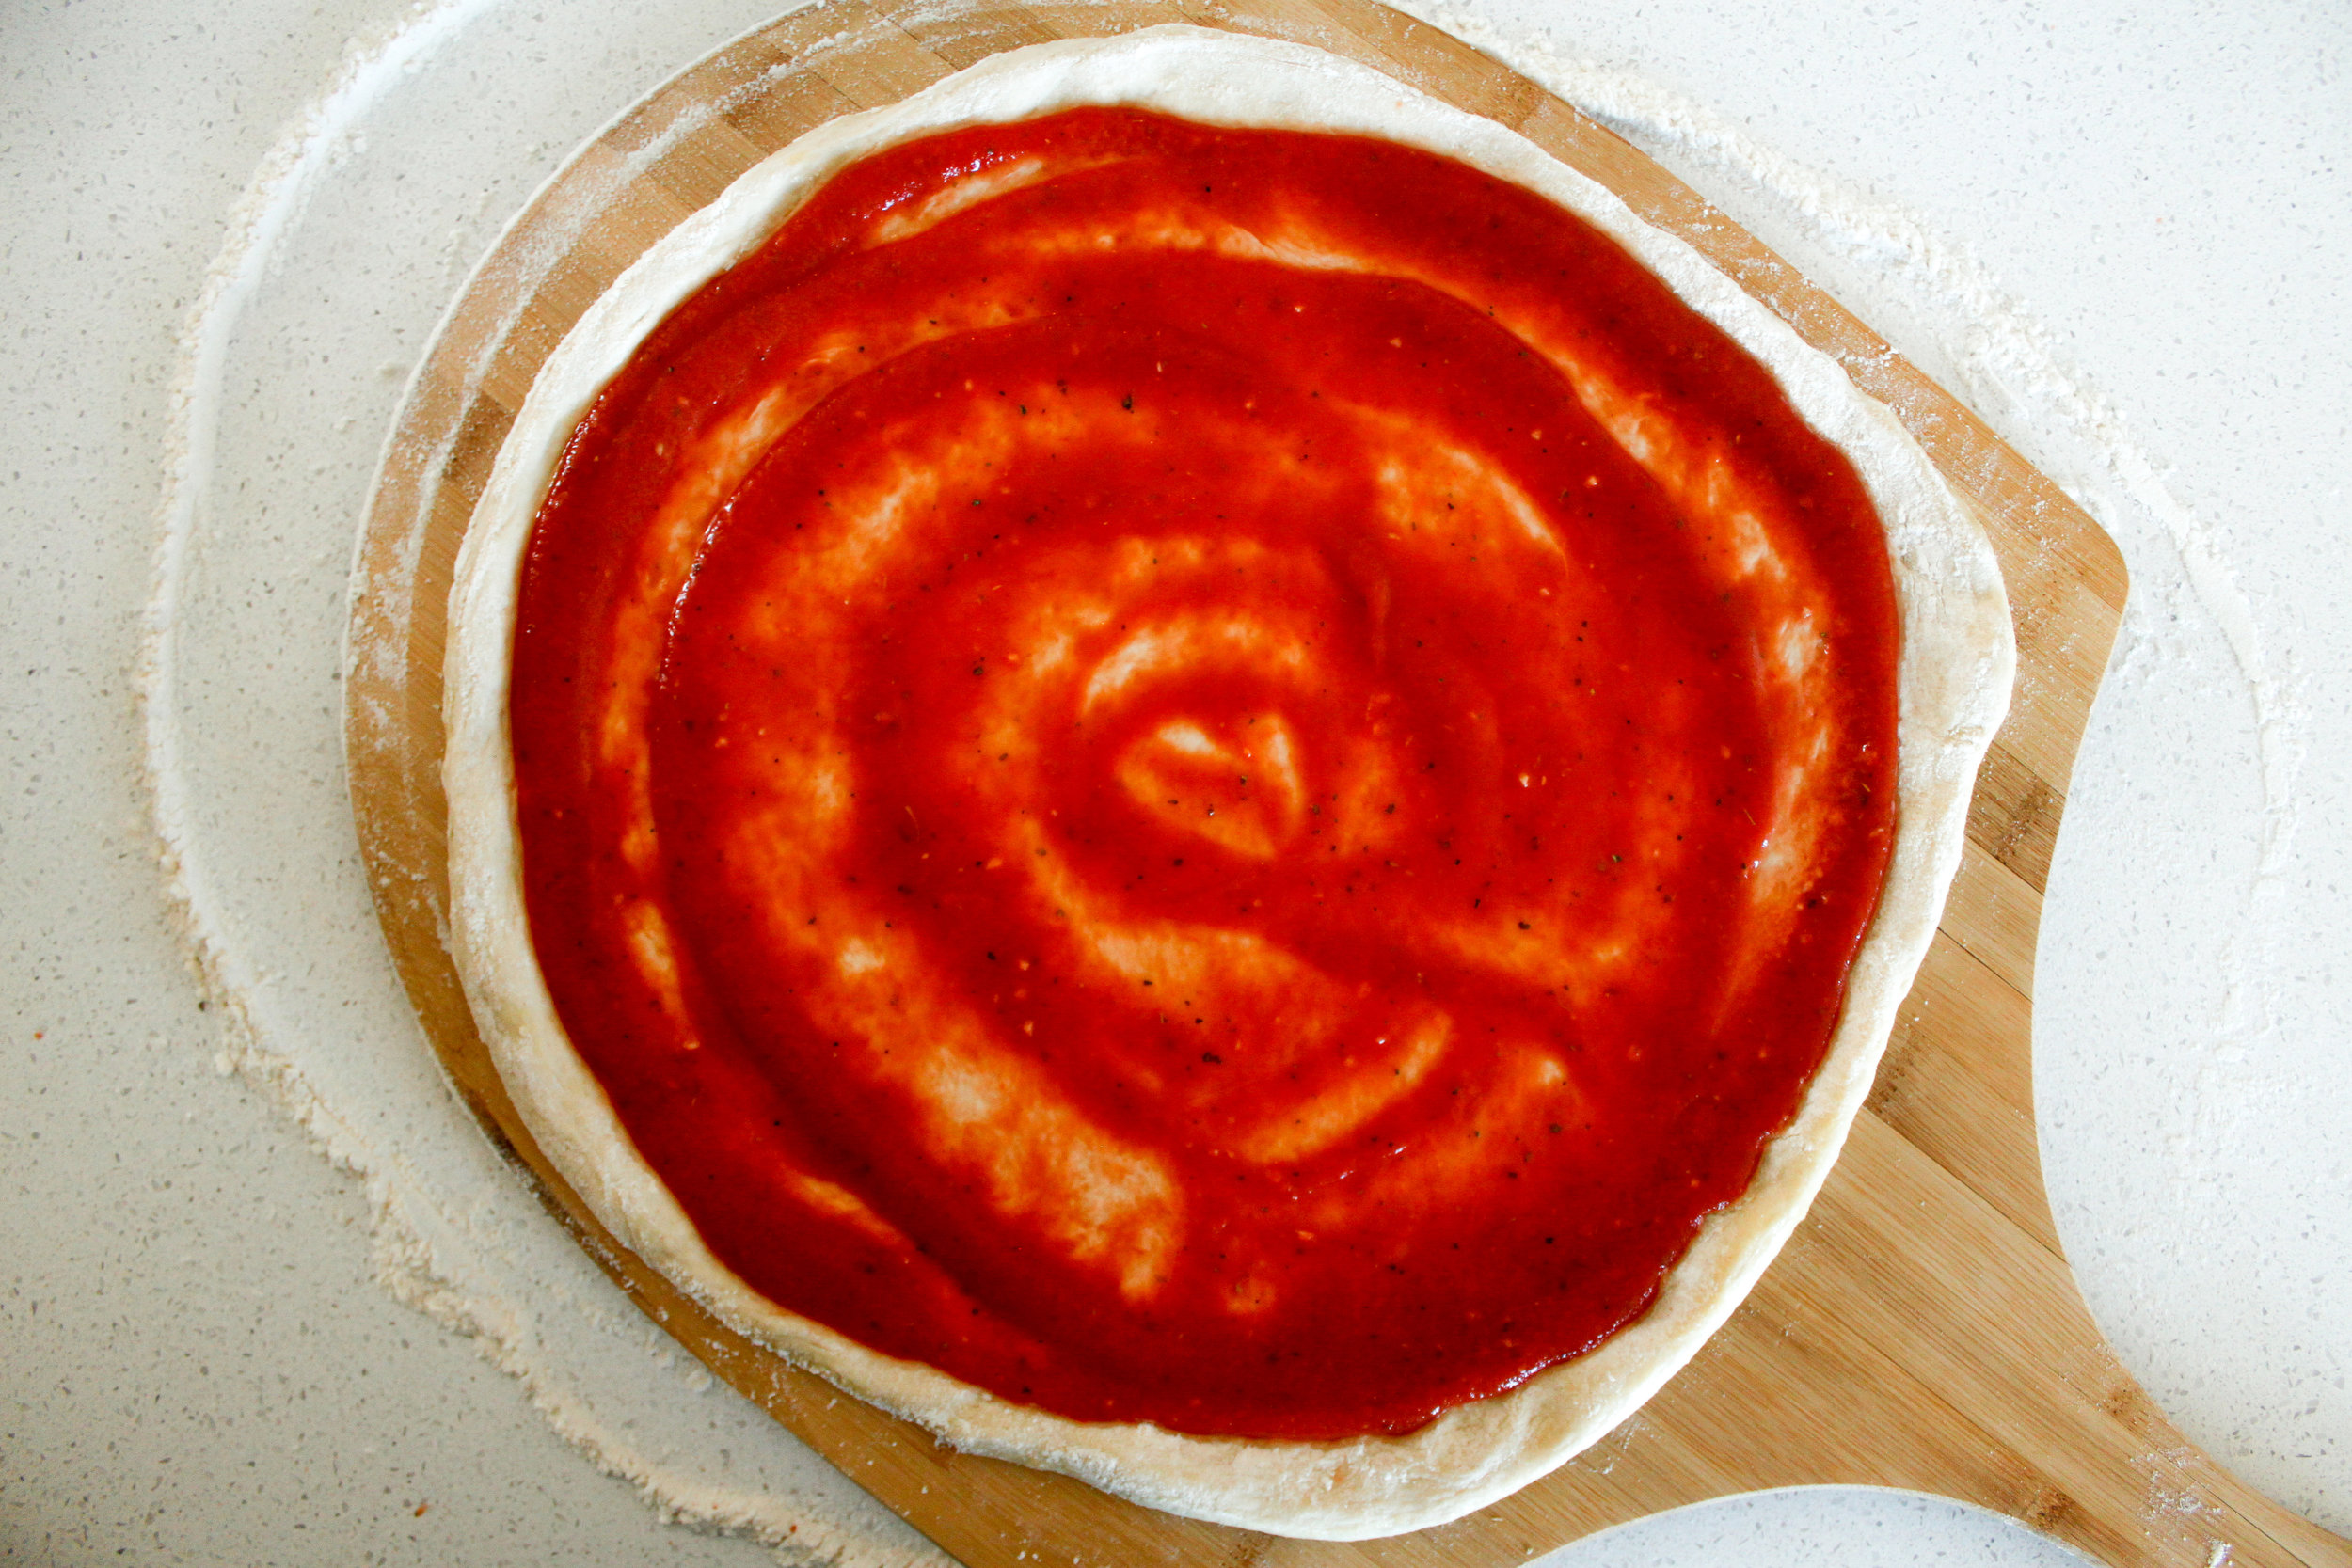
Ladle about 1/3 c of sauce onto the center of your dough and using the back of the ladle, swirl it around on the dough so it’s pretty uniform, you want it to look similar to the photo above. I like a pretty heavily sauced pizza and this was the perfect amount for me.

Now is when you add your cheese. Again- you don’t need to overdo it on the cheese. I promise you less is more. use 1/4 lb of grated mozzarella and evenly distribute it over your pie.

Slide your pie off of the peel/sheet onto the stone/sheet and keep the oven light on. It should take about ten minutes for the pie to cook but keep an eye on it! (It’s also just super fun to watch the bubbles grow). When you’re ready to take the pizza out, slide the peel back under it or use a spatula to help get it back onto the back of the sheet pan and immediately put it on the counter or cutting board. Give it a minute or so to rest before cutting it into eight, fold that slice in half and go to town.

Grandma Pizza

GRANDMA PIE (if you want to switch it up, make one or two of the doughs a grandma pie. This is a classic Brooklyn/Long Island slice. Extra garlicy, crispy oiled crust, sauce on top.)

Grate another clove or two of garlic into the sauce. Press the crust into a well oiled 9x13 pan, pressing it all the way out to the edges. Top the crust directly with the same amount of cheese you’d use for a normal pie and then spoon the sauce all over the top of it. Bake this pie in the bottom 1/3 of the preheated 500 degree oven until the edges begin to brown and the cheese is bubbling up through the sauce and impress all of your friends with your authentic cultured slice when they come over for a pizza party. Should be in the oven for a bit longer than 10 minutes but again, you’ll want to keep an eye on it.

xo
Audrey


Summer Zucchini Pappardelle by audrey gebhardt

This is not the prettiest thing you will ever eat. 

Summer Zucchini Pappardelle.png

It's the kind've beauty that your eyes won't understand, but your tastebuds will. 

Sort of like when you have a new crush and you're showing them off to your best friend but their few random instagram pictures really don't do them justice and your friend is just no understanding what your heart knows. 

Or like when you go to show someone the funniest Youtube video of all time and all of the sudden it's fallen flat and you're sitting there in the discomfort of waiting for it to be funny. You know it, but everyone else doesn't. 

It's secretly the most beautiful thing you'll eat this week. 

I made it with butter (grass fed, because I'm still bougie about butter) because I'm not always vegan. I really really like creamy salty butter. So much so that I think it belongs on a pile of sautéed vegetables that I'm trying to pass off as pasta. You can sub the butter for more olive oil and it will still be yummy!

_MG_7128.jpg

Summer Zucchini Pappardelle
serves 2

2 zucchini
2 cloves garlic
1 head baby broccoli
1 c cherry tomatoes
1 ear corn
2 TBSP olive oil
1/2 tsp salt
1/2 tsp pepper
1 TBSP butter
1/4 tsp crushed red pepper
8-12 leaves basil

Prep the zucchini- using a vegetable peeler (lots of people will tell you that you need to go buy a crazy contraption to make zucchini noodles but I'm here to tell you that's nonsense and I made pretty bomb zucchini pappardelle with a vegetable peeler I got in the Target dollar section in 2006.) peel long ribbons of the zucchini (skin and all) to the seedy part, then flip it over and repeat on all four sides. You can use the seeds but I don't because they kind've fall apart and don't hold together like long noodles should. Stack the widest noodles and cut lengthwise. 

Smash the garlic and heat it over medium heat with the olive oil in a sauté pan. Chop the broccoli lengthwise as well, into 1/4 in segments. After the garlic is pretty aromatic (about one minute), add the broccoli and cover. Allow to steam for about five minutes, stirring occasionally. 

Chop half the cherry tomatoes in half, leave the other half whole. Add all the tomatoes to the pan and cover again, lowering heat to medium low continuing to steam the broccoli and heat the tomatoes until they start to wrinkle and burst. 

Cut the corn off the cob, then use a spoon to 'milk' the starchy liquid from the cob. 

Bring the heat back up to medium and add the corn, corn juice, zucchini ribbons, salt, pepper, red pepper, and butter to the pan. Cover and allow to steam for five minutes, tossing occasionally. Add basil and cook down just until the basil wilts and the zucchini is 'al dente'.

If you want more greens! Add them when you add the basil! A handful of arugula would be delightful- or spinach!

xo
Audrey

Sugar Snap Pea Salad by audrey gebhardt

How to tell it's summer:

10 step.png

You are enveloped in what feels like a too-hot blanket every time you get in the car.

Potato chips and watermelon count as lunch, ice cream counts as dinner.

Grandpas are logging lots of hours sitting on a folding chair in their driveway looking at (?!?)

The air is so still that you can hear your friends laughing in the backyard from a block and a half away.

Bedtime? What's that? Too many nights are spent sitting around a fire, solving all of the problems of the world.

The days go on forever but still seem to end too quickly.

Backgammon is a perfectly good way to spend hours of the afternoon. 

Sugar Snap Peas start disappearing from the farmer's markets and in their place: STRAWBERRIES!

_MG_6721.jpg


Make this salad now, before it's too late! 

Bring it to a BBQ and prepare for everyone to instagram it. It's so gorgeous that you will look like a Top Chef even though it's just a few simple, fresh ingredients prepared with care.

_MG_6726.jpg


Sugar Snap Pea Salad
(adapted from Bon
Appetit)

3/4 C Buttermilk
3 TBSP Greek Yogurt
Juice of 2 lemons
large pinch of salt
pinch black pepper
1 lb Sugar Snap Peas
2 TBSP olive oil
zest & juice of one more lemon
salt & pepper, to finish

First, prep the Sugar Snaps. Remove the string by pinching the 'stem end' with your thumbnail and pulling the string off. Rinse, allow to dry on a paper towel then slice into thin strips lengthwise (it's okay if the peas pop out!).

To make this ahead of time: Place sliced sugar snaps in a dry bowl covered with a damp paper towel in the fridge until ready to serve.

When ready to serve: Prepare the buttermilk dressing (if vegan-simply omit this part! I found the sugar snaps just tossed in the simple lemon dressing was just as delicious!)
In a small bowl (or bullet style blender), whisk together the buttermilk, yogurt, juice of two lemons, salt and pepper. Pour into the bottom of the bowl you are serving the salad in.

Toss the sugar snaps with 2 TBSP olive oil, remaining juice and zest of the third lemon, salt and pepper. Serve over buttermilk dressing with tongs!

To enjoy this salad the next day, squeeze another half a lemon over the top to brighten it up and it will be as good as new!