Gluten Free

Cauliflower Fried 'Rice' (V + GF) by audrey gebhardt

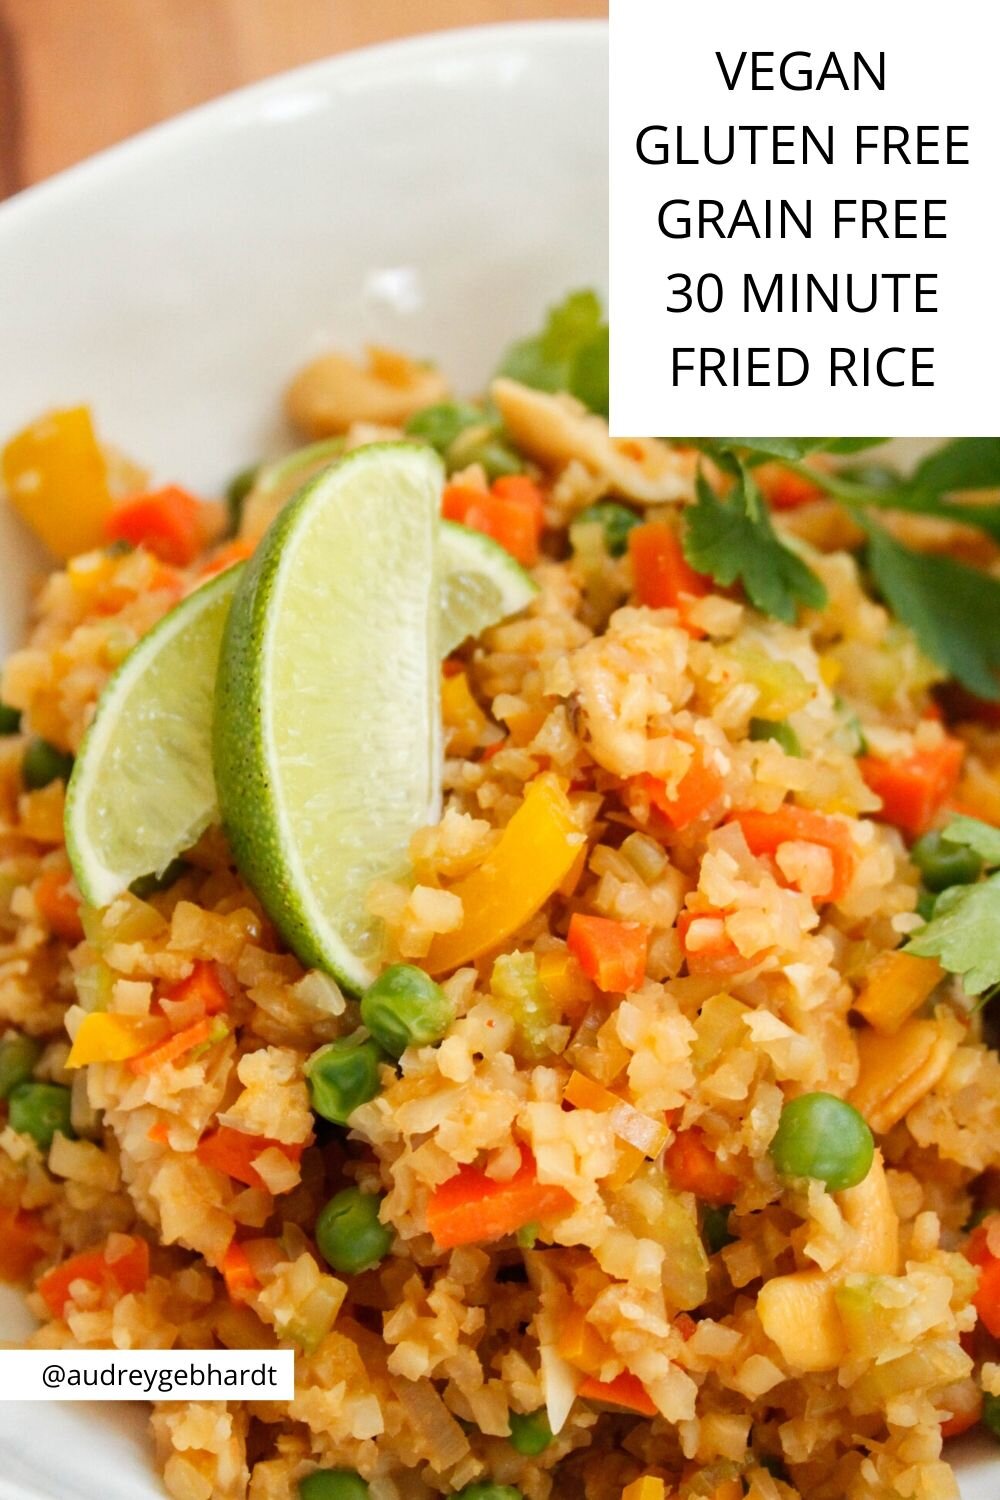
Serve this to EVERYONE. Vegans and Gluten Frees and Paleos (I think?) and grain free friends and people that eat everything because this is bomb and easy and just takes some chopping time. Add some honey if you’re not vegan. Use soy sauce if you’re not GF. Throw an egg in at the end and call it GOOD.

V/GF Cauliflower Fried Rice

INGREDIENTS
(makes enough for 4 as a side, 2 as lunch)

1 bag frozen cauliflower rice (~3 cups)
1 tsp olive oil/coconut oil
1 shallot, diced
1” ginger, grated (optional- don’t make a special trip if you don’t have it)
2 cloves garlic, grated
1 large carrot, diced small
2 stalks celery, diced small
1 c frozen peas (or fresh, whatever)
1/4 c chopped cashews
2 TBSP soy sauce or coconut aminos if GF
1/2 tsp honey (optional, omit if vegan)
1 tsp miso (also optional)
1 1/2 tsp sriracha
1 lime, cut into wedges

Start by chopping all of your veggies and setting them aside in a bowl because once that’s done, the rest is QUICK.

Saute the shallot in the oil over medium heat until translucent. Add the ginger, garlic, carrot, celery and peas and cook for 5-7 minutes until the veggies start to soften. Add the frozen cauliflower, cashews, soy sauce, honey, miso and sriracha and cook for another 7-9 minutes or so until the cauliflower is warmed through and tender. Serve with a wedge of lime and cilantro if you have it.

Optional: Add two eggs in after the cauliflower is cooked through and cook for another 2 minutes, moving the mixture around constantly to scramble the eggs into the fried rice! YUM.

VEGAN GLUTEN FREE GRAIN FREE 30 MINUTE FRIED RICE.jpg

Ballin' on a Budget: Lemon Asparagus Risotto by audrey gebhardt

I moved away from the home I lived in my whole life a bit less than a year ago. Some things have felt like a huge adjustment (not having a beach, not having a dozen houses nearby I can walk into unannounced, not eating pizza four times a week).

One of the things that I didn’t think about when I moved was the crocuses. The tiny white flowers that would pop up through the frost right outside my front door! The little flowers that could! Like clockwork, they’d show up within the first few days of March every year, snow or sunshine.

They were like the lighthouse bringing us to shore. The microwave minute nearing an end. The last hour of a red eye flight. And I miss them! I miss their cute lil faces popping up to remind us that one day we’ll be barefoot again.

So today, in Colorado, I’m calling in the crocuses of home with this Lemon Asparagus Risotto. This creamy, bright, flavorful dish comes together in about 30 minutes and pops in your mouth with a zing. All of the flavors of spring with the comfort of a still needed warm bowl of food.

In this recipe you can absolutely swap out the asparagus for whatever dark leafy green you have on hand, or even broccoli if that’s what you have! Risotto is extremely forgiving so this is a very loose recipe.

Lemon Asparagus Risotto

Lemon Asparagus Risotto (vegan optional)
Makes enough for 4 as a side dish

1/3 c diced onion
1 bunch asparagus, chopped into 3/4-1” chunks
1 lemon
1 c arborio rice
4 c vegetable stock (room temperature or warmed up-not cold!)
1 c water
2 Tbsp olive oil
1/2 tsp salt
1 tsp fresh ground black pepper
1/2 c grated parmesan cheese (optional)
2 Tbsp butter (optional)

Toast the rice. In a large saucepan over a medium low flame, place the dry cup of arborio rice. Allow the rice to toast, moving around every so often so it doesn’t burn on one side. It will turn light brown and smell super nutty- remove from pan and place aside for now.

In the pan you just used, add the olive oil and onions over a medium flame. Sauté for about 5 minutes, until the onions are soft and translucent. Add the toasted rice and two cups of the vegetable stock. Bring to a simmer and allow to simmer, stirring occasionally until almost all of the liquid is absorbed.

When almost all of the liquid is absorbed, add another cup of stock and repeat the simmering process.

Repeat with the final cup of stock. At the end of this simmering point, the rice should be nearly finished cooking.

Add the cup of water and the chopped asparagus, cook for another five minutes until all of the liquid is absorbed and the asparagus is bright bright green.

Stir in the lemon zest, salt and pepper (and at this point you can add the parm + butter if you’re using them! It’s still creamy and delicious without it but that definitely adds an extra layer of flavor!).

Serve immediately.

xo,
Audrey

Ballin' on a Budget: Tortilla Espanola by audrey gebhardt

Eggs are something that never held any appeal for me. They were always too ‘wiggly’ and I had no interest in them.

And then I had Tortilla Espanola.

Tortilla Española

I was on a yoga retreat in Spain, staying at the house of an incredible chef who would cook us these grand brunches every single day. One of those days he was serving Tortilla Espanola, and I had no idea what it was but I was intrigued. It looked like a frittata made of mostly potatoes and a little bit of egg to hold it together and you put a potato in front of me, I’ll eat it.

So I took the tiniest sliver possible. 1/2 inch of tortilla slice. And then another one. And another. I was obsessed.

About a year went by and I had no idea what this thing was, I didn’t know how to research it, I didn’t know what to call it. All I knew was it was a giant round omelette filled with potatoes and I looooved it.

This past fall, I was reminiscing about my trip to Spain with my new boyfriend who had spent a good amount of time there and loves loves loves the food culture there. I was like, '“Did you ever have that thing that’s like an omelette but not really and it’s all potatoes and it’s so good?” He immediately knew what I was talking about and made it for me that night.

That was it for me folks. Hook. Line. Sinker.

Tortilla has become a staple in our diets these past few months, it’s delicious, simple, can be made ahead of time, takes three ingredients, and best of all we get to put ketchup on it.

Tortilla is the thing that got this picky girl to even eat omelettes that don’t have potatoes in them- I’ll even eat plain old eggs now if they’re cooked just right!

You can add a few slices of onion in when you’re cooking the potatoes but I love it just how it is.

Personally, I can’t get enough of Vital Farms eggs (this is not an add, I just taste the difference in pasture raised and you can even see it- the yolks are a completely different color). It’s worth paying the $5-6/dozen. The recipe will still be under $10 for a tortilla that will feed at least three maybe four.

Tortilla Española

Tortilla Española
(makes one 9” tortilla)

6 eggs
1 lb Yukon Gold Potatoes (about 3 small-medium)
1/4 c olive oil
salt & pepper to taste

Start by slicing the potatoes (longways, you want the slices to be long so they stack better) a little less than 1/4 in thick. If you have a mandolin, even better! You don’t have to peel the potatoes as long as they’re cleaned well.

In a 9” NONSTICK saucepan, heat the olive oil over medium heat for about two minutes. Drop the potatoes in all at the same time, season with salt and pepper and let them cook over medium heat for about 20 minutes, flipping the potatoes every 3-5 minutes or so until they’re just about cooked through. You don’t want the potatoes to brown, you just want them to be a little bit tender.

Crack the eggs into a separate bowl and beat the heck out of them for about a minute before pouring the eggs over the potatoes in the pan. Lower the heat to low and allow to cook, uncovered, for about ten minutes until the eggs begin to set. If you’d like, you can run a rubber spatula around the edges of the pan to make sure the eggs aren’t sticking.

Once the eggs are about set in the middle, flip the whole tortilla onto a plate, (do this over the sink just in case!!) slide it back into the pan, cooked side up, and cook over low flame for another 5 minutes or so until the bottom is set well.

Serve hot, at room temperature, or even cold straight out of the fridge the next morning!

xo
Audrey

Deep Dark Fudge Brownies (GF) by audrey gebhardt

Let's talk about babysitter slices for a minute.

_MG_7515.jpg

You know, the kind you take when you're babysitting and they have MUCH better snacks at their house than you do at yours.

I'm talking entenmanns fudge frosted cake.

Or like two day old glazed munchkins.

Capri Sun. Ugggghhhhhh. 

The best houses though are the ones with a tray of boxed brownies. Shiny and crinkled studded with chocolate chips. You would slice off millimeter by millimeter of those brownies so the parents wouldn't know that you ate all of their snacks, right?

_MG_7514.jpg

Now, as a functioning adult, I am totally aware of the fact that the parents would not give a hoot about whether or not I was eating their snacks. In fact, they probably would want me and my 15 year old metabolism to help them with that tray of brownies. But for whatever reason it felt like a scandalous secret to sneak slices of sugar after the kids went to bed, did it not? 

_MG_7509.jpg

These brownies are reminiscent of that simple add oil water and egg boxed mix you made when you were a kid except they're about a billion times fudgier and gooier and yummier. 

_MG_7511-2.jpg

Deep Dark Fudge Brownies
(this recipe is kind've in weight. Please don't hate me. I promise it makes a difference)

85g Gluten Free Flour
1/2 tsp baking powder
1/2 tsp salt
1 1/2 sticks unsalted butter
300g sugar
3 eggs
75g cocoa powder
1 TBSP vanilla (for real no joke)
4oz dark chocolate, chopped

Preheat the oven to 350 and line an 8" square pan with parchment paper.

Whisk together the flour, baking powder and salt and set aside.

In a different bowl, whisk together the eggs, cocoa and vanilla for about a minute until super smooth and glossy.

In a medium saucepan, melt the butter and sugar over medium low heat whisking constantly. Don't let it bubble! Keep it low until the sugar has dissolved! Rub a tiny bit between your fingers to see if it's smooth. 

Slowly stream the melted butter mixture into the egg/cocoa mixture while whisking constantly until combined and then whisk for another whole entire minute- this is what will give you that glossy cracky top! Fold in the dry ingredients juuuuuust until combined, tossing the chopped chocolate near the end and folding that in too!

Spread evenly into the parchment lined pan and bake for 25 minutes, until the center is just set and doesn't jiggle when you wiggle the pan.

Let cool in the pan or be impatient like me and dig in with a spoon and burn the roof of your mouth with melted chocolate, both ways are totally okay.

Let's go have some brownies about it, shall we?

xo
Audrey

Sweet Potato Waffles (V + GF) by audrey gebhardt

Two of my Christmas gifts from the year 2000 have proven to be timeless so far.

Vegan + Gluten Free Sweet Potato Waffles

My bike (I'm still riding a kid-sized 21 speed Raleigh and I LOVE it), and my Grinch Waffle Iron.

This waffle iron made our house the sleepover house. That, and my mom was the sleepover queen. We could stay up as late as we wanted as long as we were dancing with her. She would let us use air mattresses as slides, she would have a craft ready for us to do, she made the comfiest beds on couches to sleep on and in the morning- she always made grinch waffles. 

Much more exciting than your standard belgian waffle, grinch waffles were a topic of discussion. The swirls that the syrup could swim through- the perfect circle in the middle for a pool of butter or whipped cream.

Vegan + Gluten Free Sweet Potato Waffles

My mom was also the cool aunt. The one who let my little cousins and I eat whipped cream straight from the can at 8am. 

My mom didn't have lots of rules, she mostly just did whatever she could to make sure everyone around her was having the most fun at all times. 

Vegan + Gluten Free Waffles

Sweet Potato Waffles (Vegan + Gluten Free)
makes 4

1 c cooked sweet potato
1 c oats
1 flax egg (1 Tbsp ground Flax seed + 3 Tbsp water, let sit for five minutes)
1/2 c almond milk
1 Tbsp maple syrup
1 tsp baking powder
1/2 tsp baking soda
1/2 tsp cinnamon
1/2 tsp vanilla

cooking spray, for waffle iron.

coconut cream (the top part of refrigerated coconut milk), for serving

In a blender, combine all ingredients and blend until smooth. Add more almond milk a tablespoon at a time if it doesn't seem like it will pour smoothly until it's pourable.

Heat the waffle iron and spray with cooking spray.

Pour about 1/3 cup of batter  into the iron and cook for 3-4 minutes, until golden brown.

Serve with a dollop of coconut cream (which you make by refrigerating a can of coconut milk and scooping off the thick creamy white part from the top) and maple syrup. I serve it like this for the nostalgia of when you get a waffle at a diner served with an ice cream scoop full of butter. 

This batter can be refrigerated for up to 2 days! Add a bit more milk to thin out before using.

xo
Audrey

Chocolate Peanut Butter Cake (V/GF) by audrey gebhardt

It wouldn't be fair to this dessert to call it a brownie. 

Vegan/Gluten Free Peanut Butter Cake

There are hundreds of health food junkies out there running around calling recipes similar to this 'Sweet Potato Brownies' but that's just not okay. 

Because a brownie- a brownie needs to be dense. A brownie feels like dead weight in your hands. It sticks to the roof of your mouth it's so fudgy. It has a crackly shiny top and just a 1" square is enough to satisfy.

That doesn't mean there's anything wrong with what this is- it's just simply not a brownie. It's a light, fluffy chocolate cake with a depth of flavor and ZERO DAIRY, GLUTEN or REFINED SUGAR! 

Are you kidding me? I wouldn't have believed it either. This cake is unbelievably decadent and moist and you won't even miss the sugar- I promise.

vegan gluten free peanut butter chocolate cake

Chocolate Peanut Butter Cake (vegan/gluten free)

1/2 c almond butter
1/2 c cooked sweet potato (from an actual baked sweet potato, not canned puree)
1 flax egg (1 TBSP flaxseed meal + 2.5 TBSP water)
6 TBSP maple syrup
1/4 c cocoa powder
2 tsp vanilla
1/2 tsp baking soda

1/2 c coconut manna
1/2 c creamy peanut butter
1 can full fat coconut milk, chilled overnight
1/2 tsp salt
2 TBSP maple syrup

Start by making the flax egg- in a small bowl combine the flaxseed meal and water and set aside for five minutes until it firms up.

Preheat the oven to 350 and line an 8x8" pan with parchment.

In a medium bowl, combine the almond butter and sweet potato with a fork or whisk until smooth and creamy. Whip in the flax egg and maple syrup until combined. Whisk in the cocoa powder, vanilla and baking soda. 

Pour the batter into the parchment lined baking pan, bake for 25-30 minutes until a toothpick inserted in center comes out clean.

Once the brownies have cooled completely in the pan, prepare the peanut butter frosting.

DO NOT SHAKE the can of coconut milk. Open the can and scrape the top into a small bowl, saving the transparent liquid in the fridge for smoothies at another time. Beat the coconut cream until it's light and fluffy like whipped cream. Set aside. 

In a medium bowl, beat the coconut manna with the peanut butter and maple syrup until completely combined. Fold in the whipped coconut cream until smooth and spread over cooled cake. 

Store cake in fridge until you're ready to serve. Prepare for people to propose to you when they take a bite. And then tell them it's made with all wholesome ingredients!

xo
Audrey

Cheddar Grits with Roasted Baby Broccoli by audrey gebhardt

One of the greatest compliments I've ever gotten was from a coworker who grew up in Alabama. 

Cheddar Grits with Roasted Broccoli GLUTEN FREE

She said to me, 'you're the closest I've found to a Southern Belle outside of the south.'

I have been trying to live up to that title for about five years now, wearing the fullest skirts whenever possible, drinking everything out of fancy glasses, never arriving to somebody's home without full arms, and eating grits for breakfast perhaps a little too often.

The first time I had grits was in Charleston, on a trip dripping with mystery and charm. Since then I've realized that cheesy grits are basically the next best thing to mac n' cheese when you're gluten free! Not only do I love the flavor of roasted broccoli with cheddar, I also feel much better about eating a bowl of cheesy carbs when there's something green in the mix. 

This recipe comes together in a half an hour and though I find it to be a perfect cozy breakfast, it's also a great side dish!

Cheddar Grits with Roasted Broccoli GLUTEN FREE

Cheddar Grits with Roasted Baby Broccoli
makes two hearty servings, four sides

1 1/2 cups vegetable stock
1/4 tsp salt
1 TBSP butter
1/2 c stone ground grits (I got mine at Trader Joe's)
1/2 c milk
4 oz mild cheddar cheese, grated
1/2 tsp black pepper

1 bunch broccolini
2 TBSP olive oil
pinch salt
pinch pepper

Preheat the oven to 425 and trip the ends off of the baby broccoli.

Toss the baby broccoli in olive oil, salt and pepper and place on a baking sheet in the preheated oven.

While the broccoli is roasting, prepare the grits. Bring the vegetable stock, salt and butter to a boil. Stir in the grits and bring the temperature all the way down to the lowest temperature possible (low and slow is the secret to creamy grits!) so it's just gently simmering. Stir quite often for about 15 minutes, until most of the liquid is absorbed. Stir in the milk and cook for about ten minutes more before stirring in the cheddar and black pepper to serve. 

Remove the broccoli from the oven when it's crisped and the flowerheads are just browned. Serve over grits in delight.

xo
Audrey

Watermelon Sherbet by audrey gebhardt

There are plenty of words in the English language that I avoid saying altogether. 

3-Ingredient Watermelon Sherbet

Having grown up in a very Italian area, I am distraught when I have to speak, "ricotta" aloud. 

Mozzarella is not a simple one either.

Don't even get me started on bruschetta.

The worst part is, I loved Italian class more than all of my others. I love love love the language and I know how to annunciate these things properly, I just know I'm opening myself up for unwarranted ridicule by doing so.

Sherbet fits in that category too. It's a word that sounds wrong no matter how it falls out of your mouth. The kind've word that when you order it at Friendly's, you just point to it on the menu to dodge the discomfort of saying it out loud to your server and everyone else around you. 

The best part about this being a blog and not a Youtube channel is that I get to share this magical recipe with you and none of us have to say the word. Which most definitely is not sher-bert.

I see you in your mid-summer glory, cubed melon sitting in the back of your fridge that's juuuuuuust starting to get a tiny bit slimy around the edges. Not slimy enough to throw out yet but also not crisp enough to eat right now. Let's do something about it, shall we? 

I made this with nothing but watermelon but I suspect it would work well with cantaloupe and honeydew as well, or perhaps a combination? MAYBE A MANGO?!

You don't even know it yet but you're like an hour away from the dreamiest creamiest fruitiest sherbet on the block.

3-Ingredient Watermelon Sherbet

Watermelon Sherbet
Makes 1 quart

~4-5 cups cubed watermelon, frozen solid (at least 1 hour)*
1 can sweetened condensed milk
1/4 tsp salt

*This is a rough estimate because we all have a different definition of cubed. My cubes are about 1". For me, this was 1/2 of a smallish watermelon (not a personal tiny one, a regular small one).

In a food processor, combine all three ingredients and process for about five minutes until all of the chunks and seeds have been swallowed up by the sea of pink. 

Freeze in an airtight container for about 3 hours before serving.

I served mine with cacao nibs and lime zest, reminiscent of the ever-nostalgic watermelon roll! 

xo
Audrey